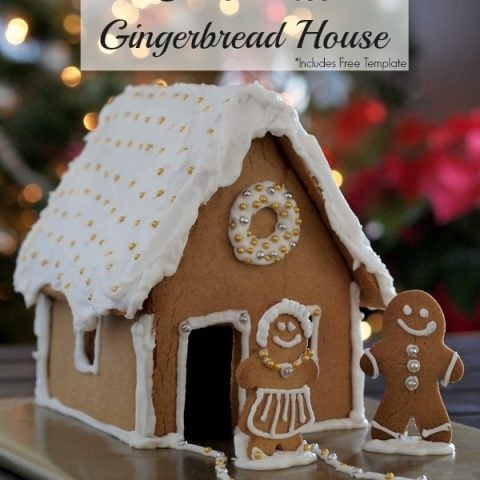
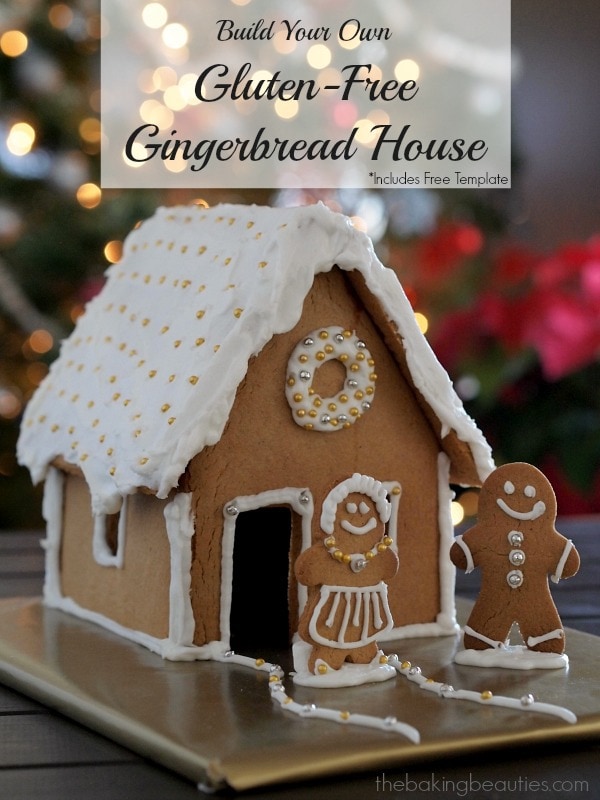
Keep the tradition alive, or start a new one, by building a Gluten Free Gingerbread House, which is also dairy free, and tastes great.

My weakness this time of year? The smell of gingerbread. Oh my goodness, is there anything better? Ginger, cinnamon, cloves combined with a little molasses, and you have the beginnings of something amazing.
It doesn’t matter if it’s gluten free Gingersnap Cookies, gluten free Gingerbread Cookies, gluten free Gingerbread Cake with Chocolate and Coffee, or this gluten free Gingerbread House, I’m in – I love the spicy combination.

Have you ever built a gingerbread house? I know a lot of people are intimidated by them, but it’s really much easier than you think! Although there are a few companies that sell gluten free gingerbread house kits, they aren’t always easy to find, and can cost quite a bit with shipping.
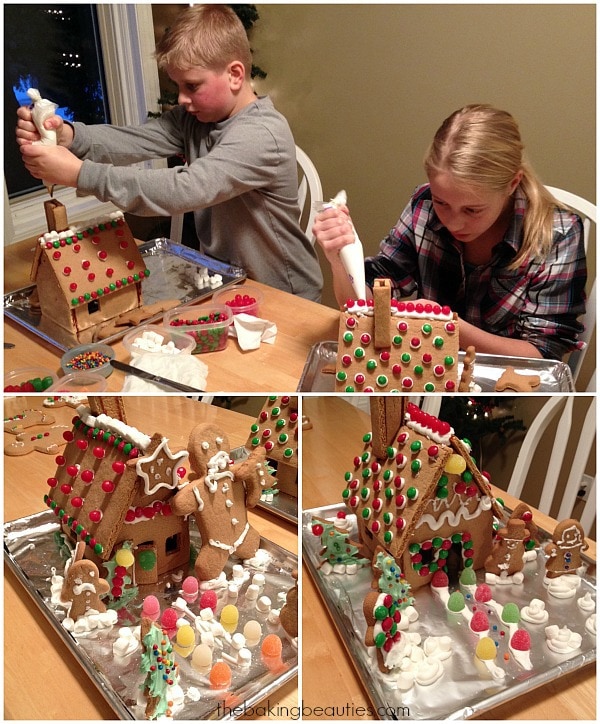
You can easily build your own gluten free gingerbread house at home, with very little frustration. My kids love helping cut the pieces out, and decorating them. They spent a full hour creating their gingerbread scenes last weekend, and now pieces of the display are mysteriously disappearing (I love gummy candy, but I just blame the mischievous elf.)
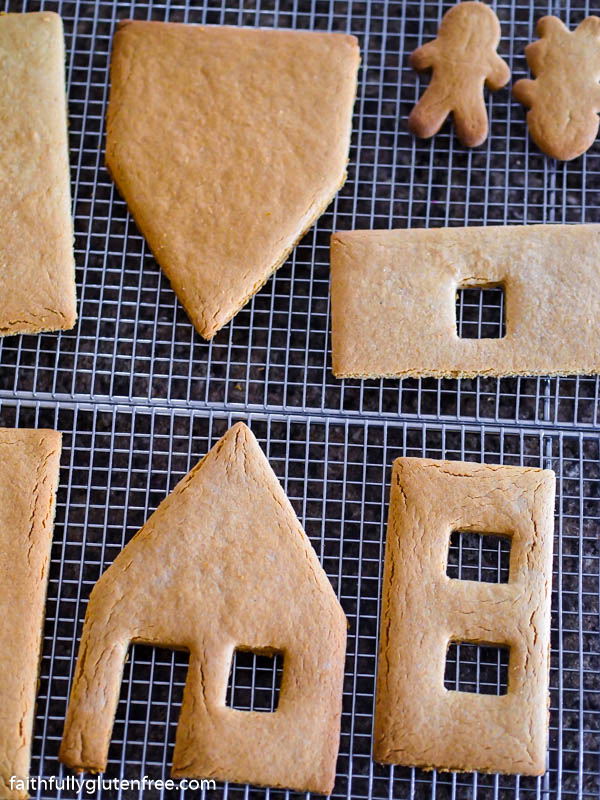
Cutting Out Your gf Gingerbread House:
My wonderful husband created a Gingerbread House Template that you can download here for FREE. It is a basic house, and the dough recipe will give you one house, plus maybe a few people and/or trees, if you want. The gingerbread tastes great to eat too, so make yourself a few gingerbread men to nibble on while decorating, if you want.

You can also use a set of cutter to build your gluten free Gingerbread House. Last year after Christmas I bought a set of gingerbread house cutters. The price was discounted because it was past the season, and it made baking a gingerbread house easier than ever.
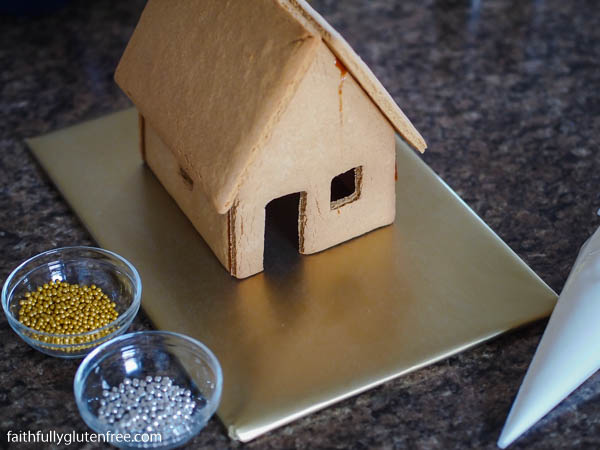
Assembling your gluten free Gingerbread House:
First, you will need to decide what you will use to build your house on. A cake board works great, as does a (seldom used) cutting board or baking sheet. Just be sure that it is rigid enough that you will be able to move your house without it sliding off.
Now sticking the house pieces together. This part doesn’t need to be difficult, and there is no need to pull your hair out doing it. My friend, who used to build gingerbread creations every Christmas, told me a tip years ago, and I’ve done it ever since.
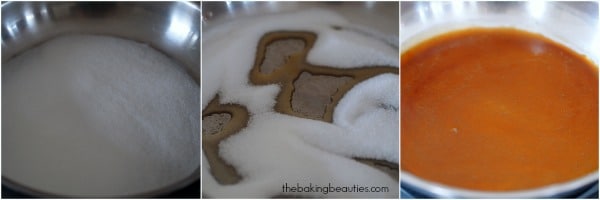
Melting Sugar:
Instead of using royal icing to assemble the house, use melted sugar! It is so easy to do, and yes, requires your attention, because melted sugar is very hot. So this is the part where you send the kids to watch Rudolph the Red Nosed Reindeer while you put their houses together.
I put about a half cup of granulated sugar in a heavy bottomed skillet over medium-high heat. The sugar will melt, and turn brown. THAT is when you want to use it. Once it reaches that colour, turn the heat down, or remove it from the stove top, and work quickly. If the sugar seems to be getting too thick, place it back on low heat to warm it up, it will get runnier again. Leave it on the heat too long, and it will turn really dark brown, you don’t want that.
Once the sugar is a nice golden colour, dip the end you want to stick in it, like you would glue, and quickly press it against the piece you are sticking it too. For this small house, I dipped the end of a side wall in, glued it to the front of the house, then repeated that with the other side wall.
Once both walls were in place and stuck, I carefully lifted it up, and dipped the other end of the walls (at the same time), into the melted sugar, and stuck it to the back wall. Now I had my 4 walls assembled, I took a spoon, and VERY CAREFULLY spooned some of the melted sugar on the slopes of the roof, working with one side at a time. If you end up with a crack at the peak of your roof, no worries, that is where the royal icing comes in.
To clean it up, use a silicone spatula to scrape the liquid sugar into an empty tin can, let it solidify before tossing it in the garbage. To clean the pan, no worries there either, just place the pan in a sink filled with hot water, and let it sit. The sugar will dissolve and the pan will be completely clean without any effort. Same for any spoons or spatulas that you used.
If some sugar dribbled down your walls while you were putting on the roof, just wait until it cools slightly and peel it off. Or, cover it with candies, which is probably easier.

Royal Icing:
There are a few ways you can make royal icing. You can use meringue powder or you can use egg whites. Both will give you a really great glue that will hold up all your decorations, and dry quite quickly. The trick to a great thick royal icing, is being sure to beat it long enough. I use my stand mixer with a whisk attachment for this, and beat it on medium-high speed for 7-10 minutes.
Click for the recipes I use:
- Royal Icing using Meringue Powder (I also use meringue powder when I decorate gluten free Rolled Sugar Cookies, so it has more than one purpose)
- Royal Icing with Egg Whites
- Here is a Vegan Royal Icing recipe, for those that want to try it (I haven’t yet)
Gluten Free Candies:
You went through all this work to bake and build a gluten free Gingerbread House, don’t forget to keep your candies gluten free as well. Here are a few lists (from 2014) to check to make sure that your candy is gluten free. ALWAYS double check the labels yourself though.
- Sure Foods Living Candy list
- Surf Sweets has a lot of gluten-free gummy candy
- Gluten Free Candy List from Celiac Mama (updated 2018)
Above all, have fun creating your gluten free Gingerbread House!
There is no right or wrong way to decorate a gingerbread house. Have fun, get creative, and make memories. That’s what gingerbread houses are all about, the memories you create while decorating (and eating) them. Merry Christmas from my little Gingerbread House to yours!
Gluten Free Gingerbread House recipe:
Gluten Free Gingerbread House
Adapted from Only Sometimes Clever
Ingredients
- 1/4 cup (30 g) millet flour
- 1/2 cup (85 g) potato starch
- 3/4 cup (120 g) brown rice flour
- 3/4 cup (155 g) sweet rice flour (also called glutinous rice flour)
- 2 1/2 teaspoons (12.5 ml) baking powder
- 1 1/2 teaspoons (7.5 ml) ground ginger
- 1 1/2 teaspoons (7.5 ml) xanthan gum
- 1 teaspoon (5 ml) ground cinnamon
- 1/2 teaspoon (2.5 ml) ground allspice
- 1/2 teaspoon (2.5 ml) salt
- 1/4 teaspoon (1.25 ml) ground cloves
- 3/4 cup (94 g) confectioners' (icing) sugar
- 1/2 cup (147 g) brown sugar, packed
- 1/2 cup ( 125 ml) vegetable shortening
- 1 large egg
- 3 tablespoons (45 ml) fancy molasses
Instructions
- Preheat the oven to 325 degrees F (163 degrees C).
- In a mixing bowl, whisk together the millet flour, potato starch, rice flours, baking powder, spices, xanthan gum, and salt. Set aside.
- In the bowl of a stand mixer fitted with a paddle attachment, beat the sugars and shortening until light and fluffy. Add the egg and molasses, and beat until well incorporated, scraping down the bowl if necessary.
- Add the dry ingredients to the wet ingredients, and stir until completely combined, and the dough forms a ball around the paddle. If the dough seems too dry, add some water, 1 teaspoon at a time. You don't want the dough to be sticky, just to hold together well. Knead the dough by hand if necessary.
- Place half the dough on a large sheet of parchment paper (not larger than your baking sheet). Roll the dough out to a thickness of 1/4-inch (0.64 cm). To ensure you have an even thickness, you can lay a 1/4-inch dowel on either side of your dough, so your rolling pin rests on the dowels.
- Lay your gingerbread house template pieces out on the dough so that there is at least 1-inch (2.5 cm) between pieces. Use a sharp knife to cut out all the pieces, and remove the excess dough, leaving only the house pieces on your parchment paper. Place a baking sheet at the edge of the counter, and carefully slide the parchment paper onto your baking sheet. Bake in the preheated oven for 15-17 minutes, or until the cookies begin to turn a light brown around the outside. You may need to turn your sheet once during baking.
- Gingerbread cookies do puff a bit when baking, so when you remove the cookies from the oven, and they are still hot, place the template back on top of the pieces and with a sharp knife, trim the cookies straight and square again. This will ensure you have straight edges when you assemble your house.
- Repeat with the remaining dough, re-rolling dough as necessary, until you have 2 roof pieces, 2 side walls, and 2 end walls, cutting out doors and windows before you bake them. If the dough starts to seem too dry to roll properly, add about a teaspoon of water and knead it to fully incorporate it. If you have trouble with the dough sticking to your rolling pin, cover it with a sheet of plastic wrap before rolling.
- Let the gingerbread pieces cool completely on a wire rack. It works great to let them sit out overnight, uncovered, so they can dry out and harden before you assemble your house.
Merry Christmas from my little Gingerbread House to yours!
Disclaimer:We are a participant in the Amazon Services LLC Associates Program, an affiliate advertising program designed to provide a means for us to earn fees by linking to Amazon.com and affiliated sites.

Shirley @ gfe & All Gluten-Free Desserts says
Beautiful work! And I never heard of melting sugar before. Great post, Jeanine! So glad you share it on Gluten-Free Wednesday this week. 🙂
Merry Christmas!
Shirley
Jeanine says
Shirley, melted sugar is like using crazy glue compared to white glue. Only edible. 😉
Karen Joy says
I’m so glad my recipe worked out so nicely for you!! Your houses look GREAT!!
Jeanine says
Thanks, Karen! I’ve used it for a few years already, always referring people to it too, because it really does hold up well. Even to larger items. Thank YOU!
vikki says
Thank you so much for this recipe! I have been wanting to make a gingerbread house for my son. I used to make them pre-gluten free. My friend also ha a child with celiac and she has also wanted to make or buy one. The bought kit she found was $40.00!!!! Much too expensive! This is a beautiful Christmas gift for both of our families. Thank you from the bottom of our hearts!!!
Joy says
I’ve been wanting to make a gingerbread house for years! I was just about to “invent” one today, so THANK YOU for posting this!
Kim says
I’m trying to print out the template for the gingerbread house but on page one there is too much white space between your comments at the top & the drawing, so the bottom of the side piece is being cut off. Could you please delete some of that white space & repost the template? Thanks!
Jeanine says
Ack, sorry, Kim! I need my husband to re-work that, and he just ran up town. It should be fixed later this afternoon. Sorry!
Kim says
Awesome thanks! Can’t wait to make a GF gingerbread house!!
Amy A says
Hi, Jeanine!
I wasn’t able to find sweet rice flour today at Bulk Barn (with a fevered child, so I was rushing a bit, probably). Is there anything else I can substitute? I have all the flours/starches you normally work with. Thanks! We are so excited to try this!
Kristi says
I haven’t been able to find sweet rice flour. Is there a substitute or can I double up one of the other ingredients?
Jeanine Friesen says
Sweet rice flour is it’s own thing – it’s different than the other starches and flours. It is sort of a combination of the two. It is also called glutinous rice flour, and can be easily found in Asian baking aisles/stores.
Naomi says
Could I use an all purpose flour (Cup 4 Cup is what I have on hand), instead of purchasing the four flours listed here? As long as it totals the same amount? Thanks!
Jeanine Friesen says
I’ve only made it as written, and the combination of flours is what i know works. I don’t use all purpose blends, because they are ALL different. You’re welcome to experiment though. If you do, report back, please. 😀
Heather M says
Thanks! I tried this today and it does taste good. The pieces are firming up right now. Looking forward to assembling tomorrow. I couldn’t find sweet rice flour so I ground up some sushi rice into flour and it is good. Maybe better with the correct one but I’m happy😀
Heather Morehouse says
This was delicious!!! Thanks so much for this. I feel like there was no sacrifice made here. And so easy. Directions are excellent.
Laurel says
Can the dough be made ahead and refrigerated?
Curtis says
My wife and I made a double batch and increase the template by 1” on each side. We didn’t have millet flour,I googled and the found one option was Buckwheat flour. Turned out great as far as taste and strength. Haven’t assembled it yet
Jeanine Friesen says
That’s awesome! Great substitution too, the spices should cover any taste that the buckwheat flour might have had. Sorghum would have been another good option. Share a pic on social media once assembled, I’d love to see it!
Erica says
We have a gingerbread party we are going to so I needed a last minute gluten free one I could take for my daughter. I love that this included the template. Since I didn’t have all the different flours I just substituted Bobs Red Mill 1 to 1 Baking Flour in ounces for each flour and it turned out great with the addition of a few teaspoons of water. Thanks!
Jeanine Friesen says
Wonderful! Glad that Bob’s 1 to 1 worked great! Merry Christmas!
Joy says
This recipe worked so well! Since most gf cookies that we make get softer as time progresses I was concerned that these cookies would too and then the houses would collapse. But the cookies got nice and crisp and went together beautifully! Thanks for the fun!
Fiona says
Hi, I’m wondering if you know why the gingerbread cracks. I was hoping to make a smooth gingerbread but like yours it’s all cracking. I don’t know enough to know if there’s anything that contributes to the cracking. Any tips?
Thanks 🙂
Erica says
I’ve been making this recipe for several years now and it always turns out so well. The gingerbread house is sturdy and beautiful.
One issue I’ve encountered is the roof pieces puffing up so much that they crinkle when they cool. Next year I will try poking a few holes in the roof to see if that helps reduce the puffiness.
I’ll also add more ginger next time as I like it a little spicier.
Overall great recipe!